
The goal of this post is to build a web interface for the chatbot developed in the previous post, using Streamlit, a free framework that makes it easy and intuitive to create web applications directly with Python.
Since this post is a direct continuation of the previous one, it is strictly necessary that you read it before proceeding. For context, the chatbot was developed as an AI agent capable of searching the internet through a tool (Tavily Search). Additionally, LangSmith was used to trace each interaction between the user and the assistant, as well as to version the prompt used.
The post also includes the application’s Dockerfile, enabling standardized deployment in any environment, regardless of the operating system. Throughout this post, the following topics will be covered:
- Environment setup
- Building the application with Streamlit
- Creating the Dockerfile
- Running the application
Environment setup
The Python version used in this project was 3.12.9. Additionally, the requirements.txt file used in the application is provided below.
Additionally, below is the .env file containing all the required environment variables. This is the same file used in the previous post, where a detailed explanation is provided.
OPENAI_API_KEY=
TAVILY_API_KEY=
LANGSMITH_TRACING=true
LANGSMITH_API_KEY=
LANGSMITH_PROJECT=Search Agent
Building the application with Streamlit
Below is the model.py file, responsible for instantiating the agent and sending the list of messages for execution.
from datetime import datetime

from dotenv import load_dotenv
from langchain.agents import create_agent
from langchain.chat_models import init_chat_model
from langchain_core.messages import HumanMessage, AIMessage, SystemMessage
from langchain_tavily import TavilySearch
from langsmith import Client

load_dotenv()

class LLMModel:
    def __init__(self, model_name: str, model_provider: str, temperature: float = 0):
        llm = init_chat_model(
            model=model_name,
            model_provider=model_provider,
            temperature=temperature
        )

        tools = [TavilySearch()]
        self.agent = create_agent(model=llm, tools=tools)

        langsmith_client = Client()

        system_prompt = langsmith_client.pull_prompt("search_agent")
        today_date = datetime.now().strftime("%Y-%m-%d")
        system_prompt = system_prompt.format(today_date=today_date)

        self.system_prompt = system_prompt

    def run(self, messages: list[dict]):
        langchain_messages = [SystemMessage(content=self.system_prompt)]

        for msg in messages:
            if msg["role"] == "user":
                langchain_messages.append(HumanMessage(content=msg["content"]))
            elif msg["role"] == "assistant":
                langchain_messages.append(AIMessage(content=msg["content"]))

        response = self.agent.invoke({"messages": langchain_messages})
        return response["messages"][-1].content
Note that it is quite similar to the code from the previous post. However, there is an important architectural difference: previously, the LLMModel class was responsible for managing the entire conversation memory (system, user, and assistant messages). Now, this responsibility has been moved to the application, which explicitly controls the conversation state. As a result, the LLMModel class becomes simpler and more decoupled, acting only as an orchestration layer: it injects the system prompt (dynamically retrieved via LangSmith in the __init__ constructor), organizes the list of received messages in the run method, and invokes the agent.
Now, below is the app.py file, which contains the entire application built with Streamlit.
import streamlit as st

from model import LLMModel

st.set_page_config(page_title="Search Agent", page_icon="🤖", layout="centered")
st.title("🌐 Search Agent")

with st.sidebar:
    st.subheader("OpenAI Model")
    model_name = st.radio(
        label="Select a model",
        options=["gpt-5-mini", "gpt-5-nano", "gpt-4.1-mini", "gpt-4o-mini"],
    )

    if st.button("Clear Chat", use_container_width=True):
        st.session_state.pop("messages", None)
        st.rerun()

if "messages" not in st.session_state:
    st.session_state.messages = [{
        "role": "assistant",
        "content": "How can I help you today?",
    }]

if st.session_state.get("model_name") != model_name:
    st.session_state.model_name = model_name
    st.session_state.llm = LLMModel(
        model_name=model_name,
        model_provider="openai",
    )

for msg in st.session_state.messages:
    with st.chat_message(msg["role"]):
        st.markdown(msg["content"])

user_input = st.chat_input("Ask a question...")
if user_input:
    st.session_state.messages.append({"role": "user", "content": user_input})

    with st.chat_message("user"):
        st.markdown(user_input)

    with st.chat_message("assistant"):
        try:
            with st.spinner("Thinking...", show_time=True):
                response = st.session_state.llm.run(st.session_state.messages)

            st.markdown(response)

            st.session_state.messages.append({
                "role": "assistant",
                "content": response
            })
        except Exception as e:
            st.error("Failed to generate a response.")
            st.exception(e)
To make it easier to explain each part of the code, a screenshot of the application’s interface is provided below. This allows you to visualize each component, making it easier to follow the explanation.
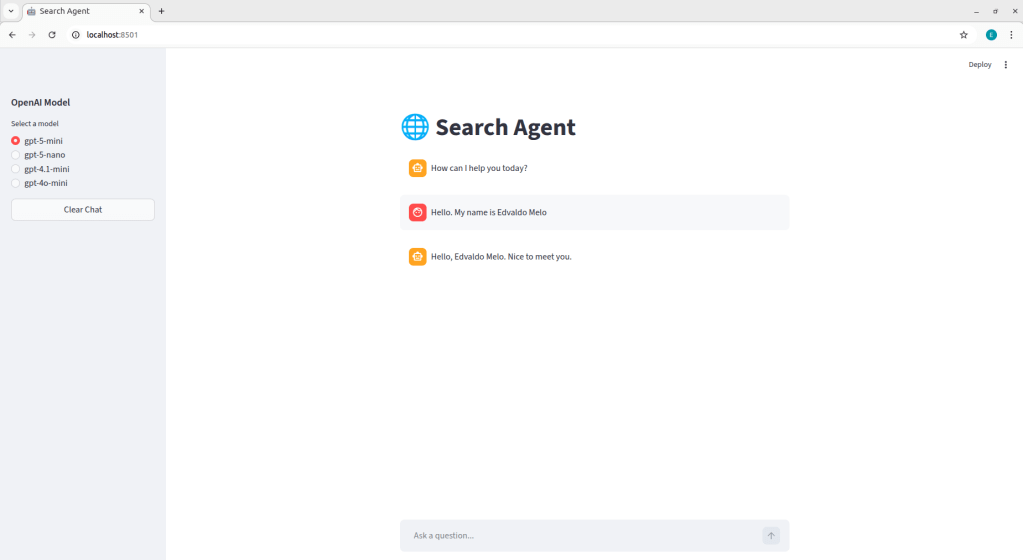
Initially, st.set_page_config() was used to define the global configuration of the Streamlit application. This function allows you to control page metadata, such as the tab title, icon, and layout structure. Next, st.title() is responsible for rendering the main header within the application interface.
Next, a sidebar was created using the with st.sidebar context, which allows components to be grouped in the left-side area of the application. Inside this sidebar, an st.radio component was added, enabling the user to dynamically select the model to be used in the current interaction. The selected value is stored in the model_name variable, which is later used to initialize the agent. A st.button("Clear Chat") was also included to reset the conversation. When triggered, it removes the "messages" key from st.session_state, clearing the stored history, and then calls st.rerun() to force the application to re-execute, ensuring the interface is immediately updated. It is worth highlighting that st.session_state is the mechanism used by Streamlit to maintain state across application executions. Since Streamlit runs the script from top to bottom on every user interaction, session_state allows information, such as the message history, to persist throughout the session. In this case, by removing the "messages" key from st.session_state, we are effectively clearing the current conversation history.
After that, a check is performed to verify whether the "messages" key exists within st.session_state. If it does not exist, it is initialized with a default assistant message: “How can I help you today?”. This logic ensures that the conversation history is created only once per session. As a result, both on the first execution of the application and after the user presses the clear chat button, the state is reinitialized with this initial message.
Additionally, a check is performed to determine whether the model currently stored in st.session_state differs from the one selected in the radio button. If they are different, st.session_state.model_name is updated with the new value, and a new instance of the LLMModel class is created and stored in st.session_state.llm. This logic ensures that whenever the user changes the model in the interface, the application dynamically reconfigures the agent responsible for generating responses, allowing model switching even during an active session.
To display the conversation history in the interface, a loop is performed over st.session_state.messages. For each stored message, st.chat_message(msg["role"]) is used to render the visual container corresponding to the message role ("user" or "assistant"), automatically displaying the appropriate avatar for each. Within this container, st.markdown(msg["content"]) is responsible for rendering the message’s textual content in the interface.
User input is captured through st.chat_input("Ask a question…"). When the user submits a message, the returned value is stored in user_input. If content exists, the message is immediately added to the messages list, ensuring that the history is updated even before the model is called. Next, the user’s message is rendered in the interface using st.chat_message("user"). Immediately after, the block responsible for generating the assistant’s response is executed. Inside st.chat_message("assistant"), st.spinner("Thinking…", show_time=True) is used to display an animation while the model processes the request. During this period, the method st.session_state.llm.run is called, receiving the entire conversation history stored in session_state as input. Once the response is returned, it is displayed in the interface using st.markdown(response) and then appended to the messages list, keeping the conversation history consistent for subsequent interactions.
Creating the Dockerfile
In simple terms, containers are isolated environments that run applications independently while sharing the host operating system’s kernel. These containers are created from images, which act as “templates” containing all the dependencies required to run the application. For example, consider a Python API that uses a PostgreSQL database. In this scenario, one image may contain the Python application and another may contain PostgreSQL. From these images, two separate containers can be executed, each responsible for a specific service.
Manually managing isolated environments and their dependencies would be a complex task. Docker addresses this complexity by abstracting it, making it easier to create, run, and orchestrate containers.
Thus, a Dockerfile was created to define the application image and its dependencies, allowing the app to run consistently on any operating system with Docker installed:
FROM python:3.12-slim

WORKDIR /app

COPY requirements.txt .

RUN pip install --no-cache-dir -r requirements.txt

COPY . .

EXPOSE 8501

CMD ["streamlit", "run", "app.py"]
FROM python:3.12-slim: defines the base image that will be used to build the container. In this case, the official Python 3.12 image available on Docker Hub is used, which is a public registry hosting container images maintained by the community and official organizations. Theslimtag indicates a lighter version of the image, based on a minimal Linux distribution. It includes only the essential components required to run Python, significantly reducing the final image size compared to the full version (python:3.12). This results in lower storage consumption and faster build times.WORKDIR /app: sets the working directory inside the container. From this instruction onward, all subsequent commands (COPY,RUN,CMD, etc.) are executed relative to/appas the base directory.COPY requirements.txt .: copies therequirements.txtfile from the local directory to the current working directory inside the container, which in this case is/app.RUN pip install --no-cache-dir -r requirements.txt: installs the dependencies listed in therequirements.txtfile during the image build process.COPY . .: copies all files from the local directory to the current working directory inside the container, which in this case is/app.EXPOSE 8501: indicates that the container will listen on port 8501 at runtime. In the case of Streamlit, this is the default port used to serve the web application. It is important to note that theEXPOSEinstruction does not automatically publish the port; rather, it serves as internal documentation of the image, indicating which port should be mapped when running the container.CMD ["streamlit", "run", "app.py"]: defines the default command that will be executed when the container starts. In this case, the container runsstreamlit run app.py, launching the Streamlit server and loading the application defined in theapp.pyfile.
Additionally, a .dockerignore file was added to prevent specific files and directories from being sent to the build context and, consequently, copied into the container image:
.venv
__pycache__
.env
.git
To run the application using Docker, it is not strictly mandatory to use the terminal (other approaches exist), but the most common method is to navigate to the directory containing the Dockerfile and execute the following commands:
docker build -t search-agent .: builds the Docker image from theDockerfilelocated in the current directory (.). The-t search-agentflag defines the name (tag) of the generated image.docker run -d -p 8501:8501 --env-file .env search-agent: runs a container based on thesearch-agentimage. The-dflag runs the container in detached mode (in the background). The-p 8501:8501parameter maps the container port to the host port, allowing the application to be accessed vialocalhost:8501. The--env-file .envoption injects the required environment variables into the container at runtime.
With this, the application will be available at http://localhost:8501.
Running the application
The purpose of this section is to present a video demonstrating the chatbot running through the interface. Initially, a test was conducted using the same questions from the previous post about the Ballon d’Or winner. Then, the chat was reset by clicking the “Clear Chat” button, starting a new conversation to test the other models and verify that they properly maintain the conversation context. Watch the video below:
It is worth noting that this is a simple chatbot. Several improvements could be implemented, such as conversation persistence through threads, the application of guardrails on both user input and model output, support for document uploads with RAG implementation, among other potential enhancements.

Leave a comment