
Human-in-the-loop (HITL) in LangGraph is a mechanism that allows pausing graph execution to request human intervention, enabling validation, approval, or adjustment of decisions before the flow continues.
Persistence in LangGraph allows saving the graph state throughout execution using checkpoints stored in a persistent storage. This enables the workflow to be interrupted and later resumed from the last saved state. This capability is essential for human-in-the-loop scenarios, where execution may be paused for human intervention and, after feedback, continue exactly from where it left off. Additionally, LangGraph provides integration with different storage options, offering flexibility in how state persistence is handled.
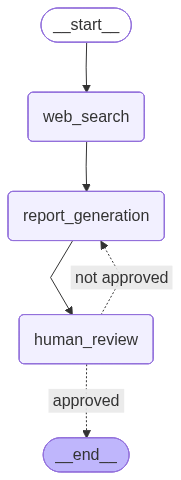
The goal of this post is to reuse the same use case from the previous post, namely report generation based on a given theme. However, the report review node, which was previously handled by an LLM, has been replaced with human feedback. In addition, to simplify interaction with the project, an API was created that allows users to submit a theme to generate the initial report, provide feedback, list all generated reports, and view the content of a specific report. To persist the state of each execution, SQLite was used as the storage mechanism. Therefore, it is highly recommended that you read the previous post to better understand the workflow. Still, to make things easier, the graph visualization is shown below:
In this post, the following topics will be covered:
- Environment setup
- Workflow creation
- API development
- Results
Environment setup
The environment setup is very similar to the previous post, using Python 3.12.9 and the following .env file:
OPENAI_API_KEY=
TAVILY_API_KEY=
LANGSMITH_TRACING=true
LANGSMITH_API_KEY=
LANGSMITH_PROJECT=Report Generator - HITL
The requirements.txt file is shown below:
Finally, the project structure is shown below:
├── chains/
│   └── reporting_agent.py
│
├── nodes/
│   ├── human_review.py
│   ├── report_generation.py
│   └── web_search.py
│
├── graph.py
├── graph_factory.py
├── schemas.py
├── server.py
└── main.py
Workflow creation
First, the reporting_agent.py file contains the LLM model responsible for generating the report. The implementation remains unchanged compared to the previous post. In addition, the prompt retrieved from LangSmith is also the same (as shown in the previous post, feel free to refer to it), and the output is a Markdown-formatted text.
from dotenv import load_dotenv
from langchain_openai import ChatOpenAI
from langchain_core.output_parsers import StrOutputParser
from langsmith import Client

load_dotenv()
langsmith_client = Client()


system_prompt = langsmith_client.pull_prompt("reporting_agent")

llm = ChatOpenAI(temperature=0, model_name="gpt-4o-mini")

report_generator_chain = system_prompt | llm | StrOutputParser()
Next, the schemas.py file is shown below:
from typing import Optional
from pydantic import BaseModel

from langchain_core.documents import Document


class ReviewResult(BaseModel):
    approved: bool
    feedback: Optional[str] = None


class ReportState(BaseModel):
    theme: str
    report: Optional[str] = None
    web_search_results: Optional[list[Document]] = None
    review: Optional[ReviewResult] = None
Unlike the previous post, where the state was defined using TypedDict, this implementation uses Pydantic’s BaseModel. This allows runtime validation and ensures that the data composing the graph state remains consistent with the defined schema.
Below is the code for the web_search.py file, located in nodes/. This node is very similar to the one from the previous post and returns a list of 5 documents related to the requested theme.
from typing import Any

from langchain_tavily import TavilySearch
from langchain_core.documents import Document

from schemas import ReportState


def web_search(state: ReportState) -> dict[str, Any]:

    theme = state.theme
    tavily_tool = TavilySearch(max_results=5)

    results = tavily_tool.invoke({"query": theme})

    web_results = []

    for result in results["results"]:
        web_results.append(
            Document(
                page_content=result["content"],
                metadata={
                    "source": result["url"]
                }
            )
        )

    return {"web_search_results": web_results}
Next, the following node is defined in report_generation.py. As in the previous post, it is responsible for generating the report using the LLM, based on the theme, feedback, and web search results.
from typing import Any

from schemas import ReportState
from chains.reporting_agent import report_generator_chain


def report_generation(state: ReportState) -> dict[str, Any]:

    theme = state.theme
    feedback = state.review.feedback if state.review else ""
    web_search_results = state.web_search_results or []

    report = report_generator_chain.invoke(
        input={
            "theme": theme,
            "feedback": feedback,
            "web_search_results": web_search_results
        }
    )

    return {"report": report}
Finally, the node responsible for interrupting the graph and requesting human feedback, defined in human_review.py, is shown below:
from typing import Any

from langgraph.types import interrupt

from schemas import ReportState, ReviewResult


def human_review(state: ReportState) -> dict[str, Any]:

    human_response = interrupt({
        "task": "Do you approve this report?",
        "instructions": "Return a JSON with 'approved' (boolean) and optional 'feedback'"
    })

    review = ReviewResult(**human_response)

    return {"review": review.model_dump()}
First, the interrupt method pauses the graph execution and returns control to the external environment responsible for execution (in this case, the API), allowing the workflow to wait for human intervention before continuing. When execution resumes, the input provided by the human is returned by the interrupt call and used to instantiate the ReviewResult model, ensuring that the response follows the expected structure (approved as a boolean and feedback as an optional string).
Additionally, the interrupt method can receive a payload that defines the context of the human intervention. In this example, the fields task and instructions are provided to describe the expected action and the response format. This payload can be used by the external environment to present the request to the user and ensure that the returned input follows the expected structure.
Next, the graph.py file, responsible for creating and compiling the graph, is shown below:
from langgraph.graph import StateGraph, START, END
from langgraph.checkpoint.base import BaseCheckpointSaver

from schemas import ReportState
from nodes.web_search import web_search
from nodes.report_generation import report_generation
from nodes.human_review import human_review


def build_graph(checkpointer: BaseCheckpointSaver):

    workflow = StateGraph(state_schema=ReportState)

    workflow.add_node("web_search", web_search)
    workflow.add_node("report_generation", report_generation)
    workflow.add_node("human_review", human_review)

    workflow.add_edge(START, "web_search")
    workflow.add_edge("web_search", "report_generation")
    workflow.add_edge("report_generation", "human_review")
    workflow.add_conditional_edges(
        "human_review",
        lambda state: (
            "approved"
            if state.review and state.review.approved
            else "not approved"
        ),
        path_map={
            "approved": END,
            "not approved": "report_generation"
        }
    )

    return workflow.compile(checkpointer=checkpointer)
Note that this graph is very similar to the one from the previous post, with some important differences. The workflow construction is encapsulated in a function that receives a checkpointer, allowing the injection of the persistence mechanism responsible for storing state checkpoints throughout execution. In addition, the review node has been modified: previously, the evaluation was performed by an LLM, whereas in this case it is carried out by a human. As a result, if the report is approved, the flow ends; otherwise, execution returns to the report generation node, forming a loop until approval.
Finally, the graph_factory.py file was created to centralize the graph creation and database connection. The create_graph function instantiates the graph already configured with a checkpointer and also returns the SQLite connection, which is used to store state checkpoints. This pattern was adopted to avoid code duplication, as the API contains multiple endpoints that require both the graph and the database connection.
import sqlite3
from langgraph.checkpoint.sqlite import SqliteSaver
from graph import build_graph


def create_graph():
    conn = sqlite3.connect(
        "report_generation.sqlite",
        check_same_thread=False
    )

    checkpointer = SqliteSaver(conn)
    graph = build_graph(checkpointer)

    return graph, conn
Note that LangGraph provides the SqliteSaver class, which implements a persistence mechanism based on SQLite. To use it, you only need to provide a database connection, which will be used to store state checkpoints throughout the graph execution. With the checkpointer configured, the graph is created through the build_graph function, which receives this checkpointer as a parameter.
For better understanding, LangGraph uses two main tables in SQLite: checkpointswrites. The checkpoints table stores snapshots of the graph state at different stages of execution. Each checkpoint represents the complete state of the application at a given point in time, allowing execution to be resumed later from that point. The writes table, on the other hand, stores intermediate changes that occur during each step of the graph execution. These changes include data produced by the nodes and messages exchanged between them, which are later consolidated into checkpoints.
writes table:
thread_id [TEXT]: identifies the graph execution (thread).checkpoint_ns [TEXT]: checkpoint namespace, used to separate contexts within the execution.checkpoint_id [TEXT]: identifies the checkpoint associated with this write operation.task_id [TEXT]: identifies the execution of a specific node within the graph.idx [INTEGER]: index of the write within the task execution.channel [TEXT]: represents the state field being updated (e.g.,theme,report,web_search_results).type [TEXT]: serialization type of the stored data (e.g.,msgpack).value [BLOB]: value stored after node execution, serialized according to the defined type.
checkpoints table:
thread_id [TEXT]: identifies the graph execution (thread).checkpoint_ns [TEXT]: checkpoint namespace, used to separate contexts within the execution.checkpoint_id [TEXT]: identifies the checkpoint associated with this write operation.parent_checkpoint_id [TEXT]: reference to the previous checkpoint, enabling reconstruction of the execution sequence.type [TEXT]: serialization type of the stored data (e.g.,msgpack).checkpoint [BLOB]: full snapshot of the graph state at that point in execution.metadata [BLOB]: metadata associated with the checkpoint (e.g., execution step, source, etc.).
API development
To expose the workflow built with LangGraph, an API was implemented using FastAPI, responsible for managing graph execution, handling interruptions (interrupt), and enabling the workflow to resume after human intervention. In future posts, I will go into more detail about APIs and FastAPI, but the focus here is to demonstrate how to integrate graph execution with an HTTP flow.
Below is the server.py file, responsible for creating the API:
import logging
from typing import Optional
from uuid import uuid4

from fastapi import APIRouter, status, HTTPException
from fastapi.responses import PlainTextResponse
from langgraph.types import Command

from graph_factory import create_graph


logging.basicConfig(level=logging.INFO)

logger = logging.getLogger(__name__)
router = APIRouter(tags=["reports"])


@router.post("/reports/generate", status_code=status.HTTP_201_CREATED)
def generate_report(theme: str) -> dict:
    graph, conn = create_graph()
    thread_id = str(uuid4())

    try:
        logger.info(
            "Generating report",
            extra={"thread_id": thread_id, "theme": theme}
        )

        _ = graph.invoke(
            {"theme": theme},
            config={"configurable": {"thread_id": thread_id}}
        )

        logger.info(
            "Successfully generated report",
            extra={"thread_id": thread_id}
        )

        return {
            "thread_id": thread_id,
            "message": "Report generation started. Use the thread_id to check status and submit feedback."
        }
    except Exception:
        logger.exception(
            "Error generating report",
            extra={"thread_id": thread_id}
        )
        raise HTTPException(
            status_code=status.HTTP_500_INTERNAL_SERVER_ERROR,
            detail="Failed to generate report"
        )
    finally:
        conn.close()


@router.post(
    "/reports/{thread_id}/feedback",
    status_code=status.HTTP_200_OK
)
def submit_feedback(thread_id: str, approved: bool, feedback: Optional[str] = None) -> dict:
    graph, conn = create_graph()

    try:
        logger.info(
            "Submitting feedback",
            extra={"thread_id": thread_id}
        )

        config = {"configurable": {"thread_id": thread_id}}
        state = graph.get_state(config)

        if not state.values:
            raise HTTPException(
                status_code=status.HTTP_404_NOT_FOUND,
                detail="Report not found"
            )

        if getattr(state, "interrupts", None):
            if not approved and not feedback:
                raise HTTPException(
                    status_code=status.HTTP_400_BAD_REQUEST,
                    detail="Feedback is required when report is not approved."
                )

            _ = graph.invoke(
                Command(
                    resume={
                        "approved": approved,
                        "feedback": feedback
                    }
                ),
                config=config
            )
        else:
            logger.warning(
                "Attempted to submit feedback for a report that is not interrupted",
                extra={"thread_id": thread_id}
            )
            raise HTTPException(
                status_code=status.HTTP_400_BAD_REQUEST,
                detail="Report is not awaiting feedback."
            )

        logger.info(
            "Successfully submitted feedback",
            extra={"thread_id": thread_id, "approved": approved}
        )

        return {"message": "Feedback submitted successfully"}
    except HTTPException:
        raise
    except Exception:
        logger.exception(
            "Error submitting feedback",
            extra={"thread_id": thread_id}
        )
        raise HTTPException(
            status_code=status.HTTP_500_INTERNAL_SERVER_ERROR,
            detail="Failed to submit feedback"
        )
    finally:
        conn.close()


@router.get("/reports", status_code=status.HTTP_200_OK)
def get_reports(max_results: int = 10) -> list[dict]:
    graph, conn = create_graph()

    try:
        logger.info(
            "Fetching reports",
            extra={"max_results": max_results}
        )

        cursor = conn.cursor()

        cursor.execute(
            """
            SELECT DISTINCT thread_id
            FROM writes
            LIMIT ?
            """,
            [max_results]
        )
        rows = cursor.fetchall()

        reports = []
        for (thread_id,) in rows:
            config = {"configurable": {"thread_id": thread_id}}
            state = graph.get_state(config)

            reports.append({
                "thread_id": thread_id,
                "theme": state.values.get("theme") or "Unknown",
                "status": "interrupted" if getattr(state, "interrupts", None) else "finished"
            })

        logger.info(
            "Successfully fetched reports",
            extra={"count": len(reports), "max_results": max_results}
        )

        return reports
    except Exception:
        logger.exception("Error fetching reports")
        raise HTTPException(
            status_code=status.HTTP_500_INTERNAL_SERVER_ERROR,
            detail="Failed to fetch reports"
        )
    finally:
        conn.close()


@router.get(
    "/reports/{thread_id}",
    response_class=PlainTextResponse,
    status_code=status.HTTP_200_OK
)
def get_report(thread_id: str) -> str:
    graph, conn = create_graph()

    try:
        logger.info(
            "Fetching report",
            extra={"thread_id": thread_id}
        )

        config = {"configurable": {"thread_id": thread_id}}
        state = graph.get_state(config)

        if not state.values:
            raise HTTPException(
                status_code=status.HTTP_404_NOT_FOUND,
                detail="Report not found"
            )

        logger.info(
            "Successfully fetched report",
            extra={"thread_id": thread_id}
        )

        return state.values.get("report") or "No content available"
    except HTTPException:
        raise
    except Exception:
        logger.exception(
            "Error fetching report",
            extra={"thread_id": thread_id}
        )
        raise HTTPException(
            status_code=status.HTTP_500_INTERNAL_SERVER_ERROR,
            detail="Failed to fetch report"
        )
    finally:
        conn.close()
Four endpoints were created to manage the graph execution lifecycle: /reports/generate, /reports/{thread_id}/feedback, /reports, and /reports/{thread_id}. Below is a brief explanation of each:
/reports/generate: starts report generation from a given theme, creating a new execution identified by athread_id.- The graph and database connection are obtained via the
create_graph()function. Athread_id(UUID) is generated to ensure uniqueness for each execution. - Logging is included to provide visibility into the execution flow, including general information and potential errors.
- To execute the graph, the
invokemethod receives thethemeprovided by the endpoint, along with a configuration containing thethread_id, enabling future state recovery. - Finally, error handling is implemented along with a finally block to ensure the database connection is properly closed.
- The graph and database connection are obtained via the
/reports/{thread_id}/feedback: allows sending human feedback for an interrupted execution, enabling the workflow to resume.- As in the previous endpoint, the graph and connection are initialized.
- Logging and error handling cover scenarios such as:
- non-existent
thread_id - rejection without feedback
- attempts to send feedback to an already completed execution
- non-existent
- After retrieving the state with
graph.get_state(config), it checks whether the execution is interrupted by verifying the presence ofinterrupts. - If so, the graph is resumed using
Command(resume=…), which sends the human response to the interruption point defined in thehuman_reviewnode.
/reports: lists existing executions, including the status of each (interrupted or finished).- The graph and connection are initialized, with logging and error handling.
- A query retrieves
thread_idsfrom thewritestable (thecheckpointstable could also be used). - For each
thread_id, the current state is retrieved usinggraph.get_state, and fields such asthemeandstatus(interruptedorfinished) are added to the response. - Finally, the list of executions is returned (
reportsvariable).
/reports/{thread_id}: returns the current content of a specific report in plain text format.- The graph and connection are initialized, with logging and error handling.
- The state is retrieved based on the
thread_id, and thereportfield is returned. - If no content is available, a default message is returned.
Finally, the main.py file, responsible for initializing the API, is shown below:
from fastapi import FastAPI
from server import router


app = FastAPI(
    title="Report Generator API - Human Feedback",
    version="1.0.0",
    description="API for managing report generation workflows with human feedback integration."
)

app.include_router(router, prefix="/api/v1")


if __name__ == "__main__":
    import uvicorn
    uvicorn.run(
        "main:app",
        host="0.0.0.0",
        port=8000,
        log_level="info",
        reload=True
    )
The application is created as an instance of FastAPI, where metadata such as title, version, and description are defined and automatically exposed in the generated documentation (Swagger UI). Next, the endpoints defined in the server.py file are registered using app.include_router, with the /api/v1 prefix. As a result, all endpoints become accessible under this prefix, for example, /api/v1/reports/generate. Finally, the server is started using uvicorn, which runs the application locally and allows access to the API via http://localhost:8000.
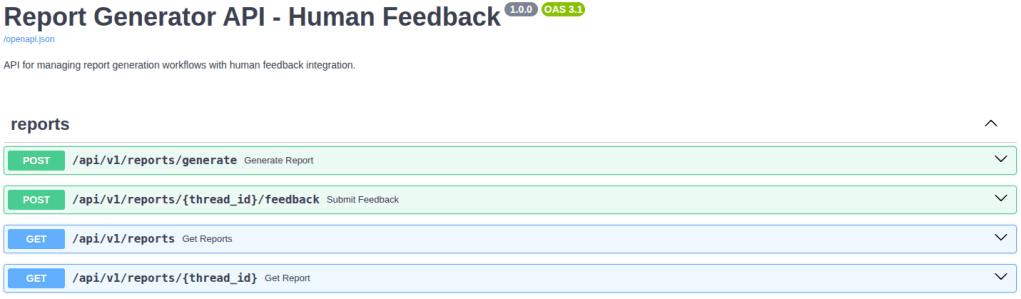
You can access the interactive API documentation (Swagger UI) at http://localhost:8000/docs, where you can view and test all available endpoints. The image below provides an overview of these endpoints:
Results
To test the project as a whole, two themes will be used: “Model Context Protocol (MCP)” and “Agent2Agent Protocol (A2A)”. The image below illustrates the use of the /api/v1/reports/generate endpoint through the interactive documentation (Swagger UI) for one of the themes:
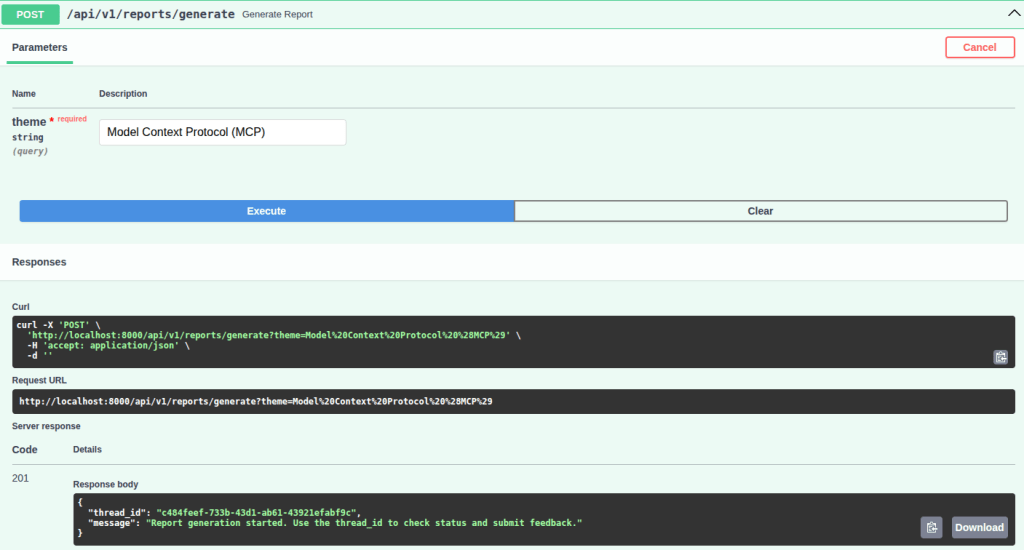
Note that the response includes the thread_id of the execution, along with a message that provides a hint on how to use it to check the status or submit feedback.
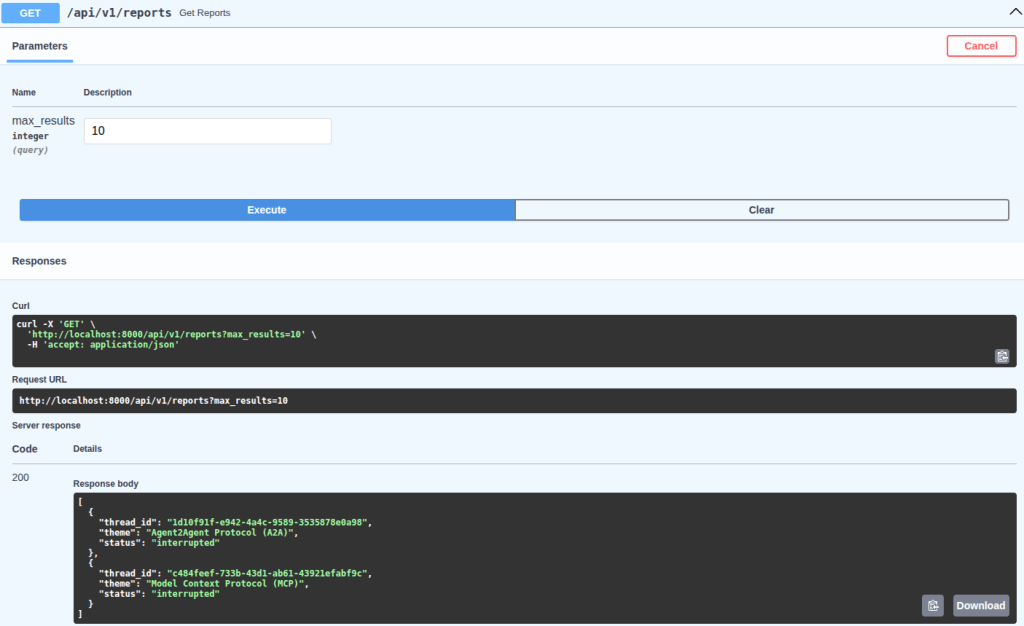
Below is the execution of the /api/v1/reports endpoint, which returns information such as thread_id and theme, along with the status of each report, indicating whether it requires feedback (interrupted) or is already completed (finished):
Now, to view a specific report, the /api/v1/reports/{thread_id} endpoint is used:
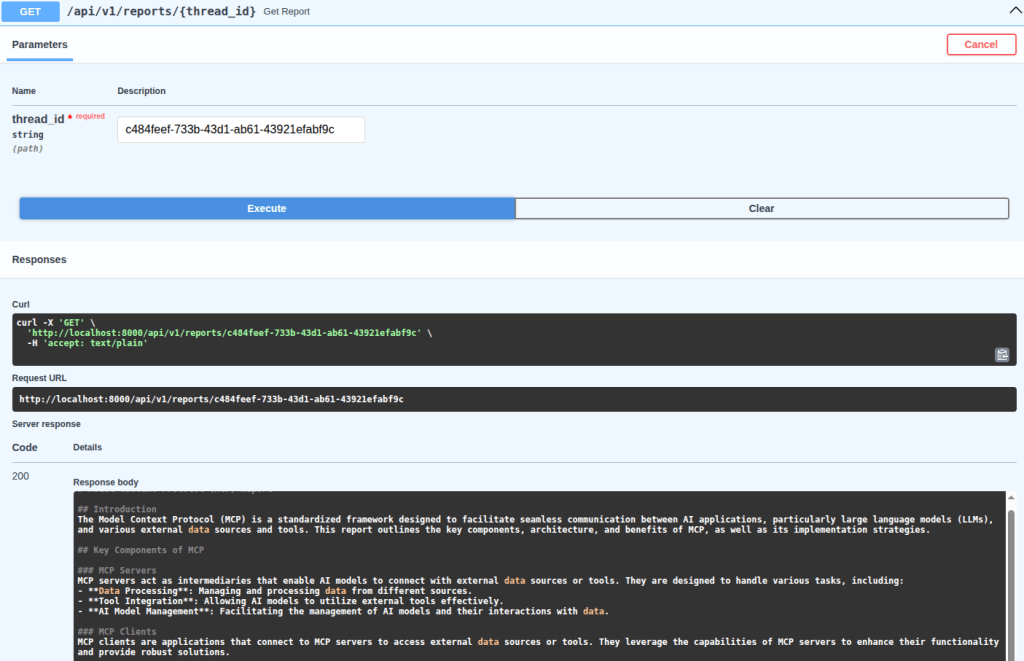
Note that, to improve readability when inspecting the generated report in Swagger UI, this endpoint returns the response in plain text. However, to view the full report, click the arrow below to expand:
Click to expand the initial report 👇
Model Context Protocol (MCP) Report
Introduction
The Model Context Protocol (MCP) is a standardized framework designed to facilitate seamless communication between AI applications, particularly large language models (LLMs), and various external data sources and tools. This report outlines the key components, architecture, and benefits of MCP, as well as its implementation strategies.
Key Components of MCP
MCP Servers
MCP servers act as intermediaries that enable AI models to connect with external data sources or tools. They are designed to handle various tasks, including:
- Data Processing: Managing and processing data from different sources.
- Tool Integration: Allowing AI models to utilize external tools effectively.
- AI Model Management: Facilitating the management of AI models and their interactions with data.
MCP Clients
MCP clients are applications that connect to MCP servers to access external data sources or tools. They leverage the capabilities of MCP servers to enhance their functionality and provide robust solutions.
Architecture
The architecture of MCP is built to ensure scalability and flexibility. Key features include:
- Container Orchestration: Utilizing platforms like Google Kubernetes Engine (GKE) for managing complex applications that require fine-grained control over resources.
- Managed Databases: Integration with managed databases such as Cloud SQL or Spanner, allowing secure querying of relational data.
- Real-Time Data Streaming: Using transport methods like Server-Sent Events (SSE) to enable real-time data access and interaction.
Benefits of MCP
- Standardization: MCP provides a consistent framework for connecting LLMs with external tools, simplifying the development process.
- Scalability: The architecture supports the deployment of MCP servers either locally or remotely, accommodating various application needs.
- Flexibility: Developers can design MCP servers tailored to specific tasks, enhancing the overall capabilities of AI models.
Implementation Strategies
Implementing MCP involves several steps:
- Message Passing: Establishing a communication protocol between MCP servers and clients.
- Production Deployment: Strategies for deploying MCP servers in a production environment, ensuring reliability and performance.
SDKs and Resources
MCP supports multiple programming languages through various SDKs, including:
For more information, developers can access the MCP GitHub repository for documentation and resources.
Conclusion
The Model Context Protocol is a powerful framework that enhances the interaction between AI models and external data sources. By standardizing communication and providing flexible architecture, MCP enables developers to create scalable and robust AI applications.
If you expand the initial report, you will notice that it does not include a references section. Therefore, as feedback, I will reject this version and request the addition of this section. See the image below:
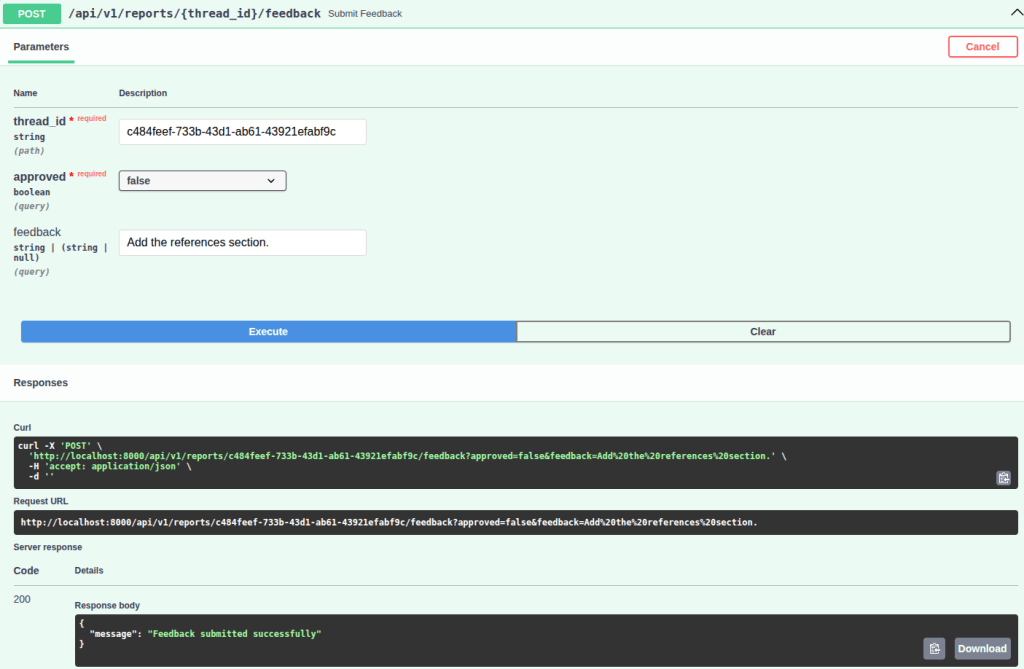
Note that the endpoint response indicates that the feedback was successfully submitted. Therefore, when calling the report retrieval endpoint (/api/v1/reports/{thread_id}) again, you can verify that the references section has been added. However, it is important to highlight that, in addition to adding the references section, the model also modified other parts of the report that were not explicitly requested. This behavior can be described as over-editing, where the model introduces unintended changes beyond the original request instead of strictly applying the specified modification. This can be mitigated through improvements to the system prompt, the use of more capable models, etc. See the final version below:
Click to expand the updated report 👇
Model Context Protocol (MCP) Report
Introduction
The Model Context Protocol (MCP) is a framework designed to standardize the interaction between AI applications, particularly large language models (LLMs), and external data sources or tools. This protocol facilitates seamless communication and data exchange, enhancing the capabilities of AI models.
Key Features of MCP
Standardized Connection
MCP creates a two-way connection that allows LLMs to easily connect with various data sources and tools. This standardization simplifies the integration process for developers.
Scalability and Flexibility
MCP servers act as intermediaries, enabling developers to design servers that can handle various tasks such as data processing, tool integration, and AI model management. This architecture allows for scalable and flexible solutions tailored to specific needs.
Managed Infrastructure
MCP can leverage managed services such as:
- Container orchestration (e.g., Google Kubernetes Engine) for complex applications requiring fine-grained control.
- Managed databases (e.g., Cloud SQL, Spanner) for secure querying of relational data.
- Serverless platforms (e.g., Cloud Run) to abstract infrastructure complexities.
Real-Time Data Streaming
Using transport methods like Server-Sent Events (SSE), MCP servers can enable real-time data streaming, making them suitable for building shared, scalable tools that can be accessed by multiple AI applications.
MCP Clients and Tools
MCP clients are applications that connect to MCP servers to access external data sources or tools. By integrating these tools, developers can create robust applications that harness the full potential of AI models, allowing for seamless interaction with a wide range of data sources.
Technical Implementation
The technical implementation of MCP involves basic message passing to advanced production deployment strategies. Developers can utilize various SDKs available for different programming languages, including TypeScript, Python, Java, and more.
Conclusion
The Model Context Protocol represents a significant advancement in the way AI applications interact with external data sources. By providing a standardized, scalable, and flexible framework, MCP enhances the capabilities of AI models, enabling them to perform more complex tasks and integrate seamlessly with various tools.
References
With that, a new feedback was submitted with approved = true, without the need to provide the feedback field. Thus, when calling the endpoint that returns information and the status of each report (/api/v1/reports) again, you can see that the Model Context Protocol (MCP) theme is now marked as finished. See the response below:
[
  {
    "thread_id": "1d10f91f-e942-4a4c-9589-3535878e0a98",
    "theme": "Agent2Agent Protocol (A2A)",
    "status": "interrupted"
  },
  {
    "thread_id": "c484feef-733b-43d1-ab61-43921efabf9c",
    "theme": "Model Context Protocol (MCP)",
    "status": "finished"
  }
]

Leave a comment