
Although an LLM is trained on a vast amount of data and is capable of generating high-quality text, it has inherent limitations, such as being restricted to the knowledge available up to its training cutoff and lacking access to domain-specific or private knowledge bases. Retrieval-Augmented Generation (RAG) is widely used to overcome these limitations by enabling the LLM to retrieve relevant information from a trusted, domain-specific, and up-to-date knowledge base. This retrieved information is then used as context to generate responses grounded in content that was not part of the model’s training data.
To better understand how RAG works, I recommend reading my previous posts on embeddings and vector databases first. In them, you’ll learn what embeddings are, why we transform data into numerical vectors, how vector databases work, and their main characteristics.
In this post, I’ll cover the following topics:
- Understanding RAG
- Knowledge Base Used by the RAG System
- Environment Setup
- Building the RAG System
- How to Run the RAG System
- Testing the RAG System
Understanding RAG
To better understand how RAG works, the figure below provides a high-level overview of its workflow.
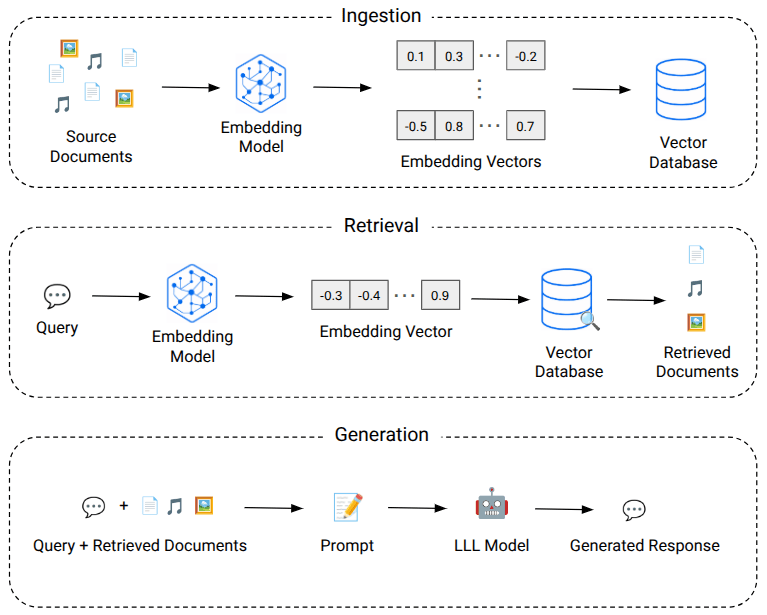
The ingestion phase is responsible for indexing the knowledge base into a vector database. This process can be performed offline, in the background, or even in real time, depending on the application. During this phase, documents (text, images, audio, etc.) are passed to an embedding model, which converts them into high-dimensional numerical vectors. These vectors are then stored in the vector database along with metadata that enables the retrieval of the original documents.
During the retrieval and generation phases, a query is submitted to the system. In the retrieval phase, the query is converted into a numerical vector, typically using the same embedding model employed during ingestion. This query embedding is then used to perform a similarity search against the vector database, comparing it with the previously indexed embeddings to retrieve the most semantically relevant documents.
Finally, during the generation phase, both the user’s query and the retrieved documents are incorporated into the prompt sent to the language model, which uses this additional context to generate a more grounded response.
RAG offers several advantages, including:
- Reduced hallucinations: by providing relevant information as context during response generation, it reduces the likelihood of the LLM producing incorrect or fabricated information.
- Up-to-date information: since responses are generated using documents retrieved from the vector database, the system can leverage the latest information without retraining the LLM. Simply updating or reindexing the stored documents makes the new information available for retrieval.
- Domain-specific knowledge: it enables the indexing of internal documents, proprietary information, and domain-specific knowledge that are not part of the LLM’s training data.
- Greater flexibility: it can be applied across a wide range of domains and use cases, including virtual assistants, technical support, document analysis, and scientific research.
As a result, RAG gives organizations greater control over the knowledge used by the LLM to generate its responses.
Knowledge Base Used by the RAG System
The system presented in this post consists of an assistant capable of answering questions about a fictional company called Deep Data Qualifications (DDQ). To support this, I created a fictional knowledge base with the help of an AI, containing documentation about the company, its platform, services, features, subscription plans, and other relevant information.
Below, I’ve provided the file so you can view and/or download it. Although it is available in .txt format for easier downloading, the code presented later in this post uses the .md version.
As this system uses only a single document as its knowledge source, the ingestion phase can be performed as an offline process.
Documents are typically divided into chunks, that is, smaller pieces that are indexed in the vector database. Although it is possible to use the entire document as context, doing so would significantly increase the prompt size, potentially exceeding the LLM’s context window, increasing token costs, adding latency, and even degrading response quality due to the excessive amount of information provided to the model.
Since the document has a well-defined structure, the chunking strategy adopted was to use the \n---\n separator, ensuring that each chunk corresponds to an entire section of the documentation. This prevents a single section from being split across multiple chunks, preserving its context. Other chunking strategies could also be used, such as splitting documents by a fixed number of characters, using chunk overlap, or applying semantic chunking techniques. I’ll cover different chunking strategies in a future post.
Environment Setup
The project’s file structure is shown below:
.
├── documents/
│   └── company_overview.md
├── .env
├── ingestion.py
├── main.py
└── rag_engine.py
In the .env file, you need to configure your OpenAI API key, as the project uses one of OpenAI’s models.
OPENAI_API_KEY=your_openai_api_key
Below is the requirements.txt file, which contains all the dependencies required to run the project.
Building the RAG System
The goal of this section is to explain the code used in each .py file of the system. First, below is the rag_engine.py file:
from dotenv import load_dotenvfrom langchain_openai import ChatOpenAI, OpenAIEmbeddingsfrom langchain_core.prompts import ChatPromptTemplatefrom langchain_qdrant import QdrantVectorStorefrom qdrant_client import QdrantClientfrom qdrant_client.models import Distance, VectorParamsload_dotenv()class RAGEngine: def __init__(self, collection_name: str): self.embeddings = OpenAIEmbeddings(model="text-embedding-3-large") self.collection_name = collection_name self.qdrant_client = QdrantClient(url="http://localhost:6333") self.llm = ChatOpenAI( model="gpt-4.1-mini", temperature=0, ) def ingest_document(self, document: str) -> None: print("🚀 Starting document ingestion...") self.qdrant_client.create_collection( collection_name=self.collection_name, vectors_config=VectorParams( size=3072, distance=Distance.COSINE ) ) chunks = [ chunk.strip() for chunk in document.split("\n---\n") if chunk.strip() ] qdrant_vector_store = self._get_vector_store() qdrant_vector_store.add_texts(texts=chunks) print(f"✅ Ingestion completed: {len(chunks)} chunks stored successfully.") def retrieve(self, question: str, top_k: int = 5) -> str: qdrant_vector_store = self._get_vector_store() search_results = qdrant_vector_store.similarity_search( query=question, k=top_k ) context = "\n\n".join( chunk.page_content for chunk in search_results ) return context def generate_answer(self, question: str, context: str) -> str: system_prompt = ( "You are an AI assistant for Deep Data Qualifications (DDQ).\n" "Your purpose is to answer questions about DDQ, including its products, " "platform, APIs, services, features, pricing, security, and documentation.\n" "Answer the user's question using only the provided context.\n" "Provide the most complete answer possible from the available context without " "referring the user to other documentation or sections unless the user explicitly " "asks where to find more information.\n" "If the provided context is insufficient to answer the question, simply state that you " "do not know the answer instead of mentioning missing documentation.\n" "If the user's question is unrelated to DDQ or outside your scope, politely explain that " "you can only answer questions about DDQ.\n" "Do not make assumptions, infer unsupported facts, or invent information." ) user_prompt = ( "Context:\n{context}\n\n" "Question: {question}" ) messages = ChatPromptTemplate.from_messages([ ("system", system_prompt), ("human", user_prompt), ]).format_messages( context=context, question=question, ) response = self.llm.invoke(input=messages) return response.content def _get_vector_store(self) -> QdrantVectorStore: return QdrantVectorStore( client=self.qdrant_client, collection_name=self.collection_name, embedding=self.embeddings, )
The purpose of the RAGEngine class is to encapsulate the main stages of a RAG system: document ingestion, relevant context retrieval, and answer generation.
__init__: the constructor receives the collection name as a parameter. First, the OpenAItext-embedding-3-largeembedding model is initialized. Next, the Qdrant client is created, which connects to the vector database used in this project. The database runs locally inside a Docker container, whose configuration will be presented later. Finally, thegpt-4.1-miniLLM is initialized withtemperature=0to produce more deterministic responses._get_vector_store: this private helper method creates and returns an instance ofQdrantVectorStore, which serves as an interface between LangChain and the collection stored in Qdrant. To do so, it uses the Qdrant client, the collection name, and the embedding model initialized in the constructor.ingest_document: this method performs the ingestion of the document passed as a parameter. First, it creates a Qdrant collection configured to store 3072-dimensional vectors, matching the embeddings produced by thetext-embedding-3-largemodel. It also configures cosine distance as the similarity metric. Next, the document is split into chunks using the\n---\nseparator. Leading and trailing whitespace is removed from each chunk, and empty chunks are discarded. Finally, the chunks are added to the collection using theadd_textsmethod. During this process, LangChain uses the embedding model to convert each chunk into a vector before storing it in Qdrant.retrieve: this method receives the user’s question and the maximum number of chunks to retrieve, defined by thetop_kparameter, whose default value is 5. First, it obtains theQdrantVectorStoreinterface. Next, thesimilarity_searchmethod converts the user’s question into an embedding, performs a similarity search over the collection, and returns thetop_kmost relevant documents. This process is explained in greater detail in my posts about embeddings and vector databases. Finally, the contents of the retrieved documents are combined into a single string, which is then used as context during answer generation.generate_answer: this method receives the user’s question and the retrieved context. First, the system prompt, which defines the behavior of the LLM, and the user prompt, which contains the retrieved context and the user’s question, are defined. Next, the prompts are organized usingChatPromptTemplate, which generates the list of messages sent to the LLM. Finally, theinvokemethod executes the model and returns the generated response.
Next, below is the ingestion.py file, which is responsible for ingesting the documents into the vector database:
from rag_engine import RAGEngineif __name__ == "__main__": with open("documents/company_overview.md", "r", encoding="utf-8") as file: document = file.read() rag = RAGEngine("company_overview") rag.ingest_document(document)
Essentially, this script imports the RAGEngine class, reads the markdown file located at documents/company_overview.md, and stores its contents in the document variable. Next, it creates an instance of RAGEngine, passing the collection name as a parameter. Finally, it calls the ingest_document method, which is responsible for splitting the document into chunks, generating an embedding for each chunk, and indexing them in the vector database.
Finally, below is the main.py file, which is responsible for the application’s main execution by invoking the assistant to answer the user’s questions:
from rag_engine import RAGEngineif __name__ == "__main__": rag = RAGEngine("company_overview") print("🤖 DDQ Documentation Assistant") print("⚠️ Type 'exit' to close the application.\n\n") while True: question = input("Question: ").strip() if question.lower() == "exit": break if not question: continue context = rag.retrieve(question, top_k=5) answer = rag.generate_answer(question, context) print(f"\nAnswer:\n{answer}\n")
First, an instance of the RAGEngine class is created, with the collection name passed as a parameter. Next, a loop is started and continues running until the user enters exit. At each iteration, the user is prompted to enter a question. If no question is provided, the loop simply continues waiting for a new input. Otherwise, the retrieve method retrieves the five most relevant chunks for the question, since the default value of top_k is 5. These chunks are then used as context by the generate_answer method to produce the assistant’s final response.
How to Run the RAG System
This section serves as a guide to running the application. First, start the Qdrant container using the Docker command below:
docker run --name qdrant_vector_db -dit -p 6333:6333 qdrant/qdrant
To access Qdrant through your browser, go to http://localhost:6333/dashboard. From there, you can view information such as collections, datasets, and other resources managed by Qdrant.
Next, run the ingestion.py file to index the documents into Qdrant, since data ingestion in this system is performed offline. Once it finishes, you should see the following output:
🚀 Starting document ingestion...✅ Ingestion completed: 72 chunks stored successfully.
Finally, you can run the main.py file. Below is an example using “Hello” as the user’s question, followed by exiting the application with exit:
🤖 DDQ Documentation Assistant⚠️ Type 'exit' to close the application.Question: HelloAnswer:Hello! How can I assist you with Deep Data Qualifications (DDQ) today?Question: exit
Testing the RAG System
The goal of this section is to test the assistant by asking questions that require specific knowledge about the fictional company Deep Data Qualifications (DDQ).
Below is the first test, using the question “What are the main steps required to start using the DDQ Platform?”:
Question: What are the main steps required to start using the DDQ Platform?

Answer:
The main steps required to start using the DDQ Platform are:

1. **Create and verify your DDQ account**
   - Visit the DDQ Platform and sign up by providing your full name, company name, business email, and password.
   - Verify your email address to activate your account.

2. **Create your first project**
   - Navigate to the Projects section.
   - Click "Create Project," enter a project name, optionally add a description, and create the project.
   - You can create multiple projects for different applications or environments.

3. **Generate and securely store an API key**
   - Open your project and go to API Management.
   - Click "Generate API Key," provide a descriptive name, and copy the generated key.
   - Store the API key securely as it is shown only once.

4. **Authenticate API requests using the API key**
   - Include the API key in the `Authorization` header of all API requests in the format:
     `Authorization: Bearer YOUR_API_KEY`

5. **Submit your first qualification request**
   - Send a request to the Data Qualification API (e.g., customer qualification) with the required data in JSON format.
   - A successful response will return qualification results including normalized values and validation status.

6. **Monitor API usage through the Dashboard**
   - Use the Dashboard to track API activity, usage metrics, request statistics, processing history, and system status.

Following these steps will enable you to start using the DDQ Platform and its Data Qualification API effectively.
To demonstrate that the gpt-4.1-mini model used in this project has no knowledge of the fictional DDQ company, below is the result of the same test using the same question. Instead of using the retrieve method to generate the context variable in the main.py file, context was replaced with "No provided context.":
Question: What are the main steps required to start using the DDQ Platform?

Answer:
I do not have information about the main steps required to start using the DDQ Platform based on the provided context. If you can provide more details or context, I would be happy to help.
Below is another test, using the question “Which data qualification services does DDQ provide?”:
Question: Which data qualification services does DDQ provide?

Answer:
DDQ provides five main data qualification services through its Data Qualification API:

1. Customer Qualification
2. Company Qualification
3. Address Qualification
4. Email Qualification
5. Phone Qualification

These services enable applications to validate, normalize, and enrich structured business data in real time. They can be used independently or combined within a single qualification request to improve the quality, consistency, and completeness of business data.
Finally, below is one last test using the question “What information can I monitor from the DDQ Dashboard?”:
Question: What information can I monitor from the DDQ Dashboard?

Answer:
From the DDQ Dashboard, you can monitor the following information:

- Total API requests
- Successful requests
- Failed requests
- Average response time
- Monthly usage
- Remaining quota
- Processed records
- Qualification success rate
- Processing history
- System status

These metrics provide a centralized view of platform activity and API usage.
Notice that all the questions asked require specific knowledge about the fictional DDQ company, which is not part of the LLM’s knowledge. By using RAG, this knowledge is retrieved from the knowledge base and provided to the model as context during answer generation, allowing it to produce more grounded responses while reducing the likelihood of hallucinations.


Leave a comment